Deploy an NFT on Edgeware using Hardhat
\ Guided tutorial on how to setup and deploy an ERC721 Non-Fungible Token (NFT) to a local network, as well as Edgeware's testnet (Beresheet), and mainnet network(s) using the Hardhat Ethereum development.

Setting up the project
Let’s start an npm project first:
npm init --yes
Then install the Hardhat package:
npm install --save-dev hardhat@2.2.1
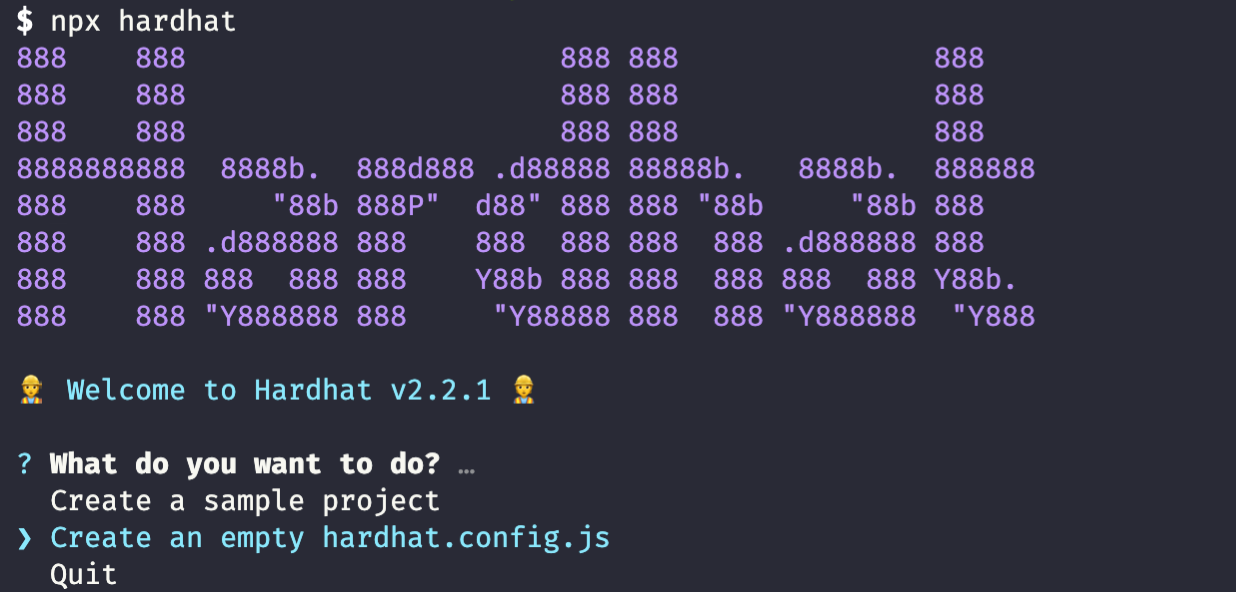
Now you are ready to create a new Hardhat project:
npx hardhat
Choose Create an empty hardhat.config.js
This will create hardhat.config.js in your root directory with the solidity compiler version specified:
/**
 * @type import('Hardhat/config').HardhatUserConfig
 */
module.exports = {
  solidity: "0.7.3",
};
tip
Error: 'You need to install hardhat locally to use it.'
Run: npm install -save-dev "hardhat@^2.6.5" in your hardhat project's root directory
How to Write and Compile the Contract
We will start by writing a simple contract and then we'll compile it.
terminal
mkdir contracts && cd contracts && touch MyEdgNFT.sol
We'll use the open-zeppelin package to write our NFT contract. So first, install the open-zeppelin package:
terminal
npm install --save-dev @openzeppelin/contracts@3.4.0
Here is the contract code we will be compiling:
MyEdgNFT.sol
pragma solidity ^0.7.3;

import "@openzeppelin/contracts/token/ERC721/ERC721.sol";

contract MyEdgNFT is ERC721 {
    constructor(string memory name, string memory symbol)
        ERC721(name, symbol)
    {}
}
The first thing you need to do in any solidity file is to declare the compiler version. Then we can import the ERC721 contract (NFT contract) from open-zeppelin just like you do in JavaScript.
Solidity is a contract-oriented language. Just like an object-oriented language, contracts can have members such as functions and variables. In our code, we have only the constructor, which will be called when we deploy our contract.
Our contract inherits the ERC721 and then passes the name and symbol arguments which are going to be passed to the ERC721 contract. They literally decide the name and symbol of your NFT token.
We will pass whatever values we want to name and symbol at the point of deployment.
To compile it, run:
npx hardhat compile
You might get some warnings but we'll ignore them to keep things simple. You should see Compilation finished successfully at the bottom.
You should also notice that the /arfifacts and /cache directories were generated. You don’t have to worry about them for this post, but it’s good to keep in mind that you can use abi in the artifacts if you want to interact with the contract when you build the frontend.
How to Test the Contract
Since smart contracts are mostly financial applications – and they're also hard to change – testing is critical.
We will use some packages for testing. Install with the command below:
npm install --save-dev @nomiclabs/hardhat-waffle ethereum-waffle chai @nomiclabs/hardhat-ethers ethers
ethereum-waffle is a testing framework for smart contracts. chai is an assertion library. We'll write tests in waffle using Mocha alongside Chai. ethers.js is a JavaScript SDK for interacting with the Ethereum blockchain. The other two packages are plugins for Hardhat.
Now, let’s make a new directory test in the root directory and make a new file called test.js in it:
mkdir test && cd test && touch test.js
Make sure you require @nomiclabs/hardhat-ethers in the hardhat.config.js to make it available everywhere:
require("@nomiclabs/hardhat-ethers");
Here is a simple test:
test.js
const { expect } = require("chai");

describe("MyEdgNFT", function () {
  it("Should return the right name and symbol", async function () {
    const MyEdgNFT = await hre.ethers.getContractFactory("MyEdgNFT");
    const myEdgNFT = await MyEdgNFT.deploy("MyEdgNFT", "ENFT");

    await myEdgNFT.deployed();
    expect(await myEdgNFT.name()).to.equal("MyEdgNFT");
    expect(await myEdgNFT.symbol()).to.equal("ENFT");
  });
});
This code deploys our contract to the local Hardhat network and then checks if the name and symbol values are what we expect.
Run the test:
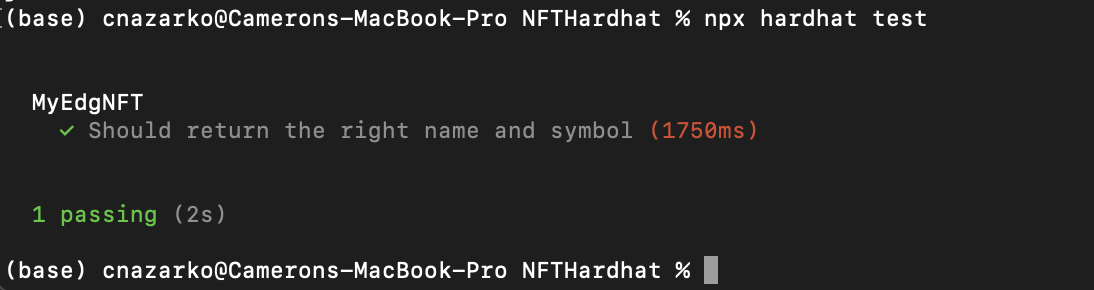
Awesome, it passed the test!
How to Use console.log() in Hardhat
Now here is the coolest thing you can do with Hardhat. You can use console.log() just like you do in JavaScript, which was not possible before. console.log() alone is more than enough reason to switch to Hardhat.
Let’s go back to your solidity file and use console.log().
pragma solidity ^0.7.3;

import "@openzeppelin/contracts/token/ERC721/ERC721.sol";
import "hardhat/console.sol";

contract MyEdgNFT is ERC721 {
    constructor(string memory name, string memory symbol) ERC721(name, symbol) {
        console.log("name", name);
        console.log("symbol", symbol);
        console.log("msg.sender", msg.sender); //msg.sender is the address that initially deploys a contract
    }
}
And run the test again with npx hardhat test. Then the command will compile the contract again, and then run the test. You should be able to see some values logged from the contract.
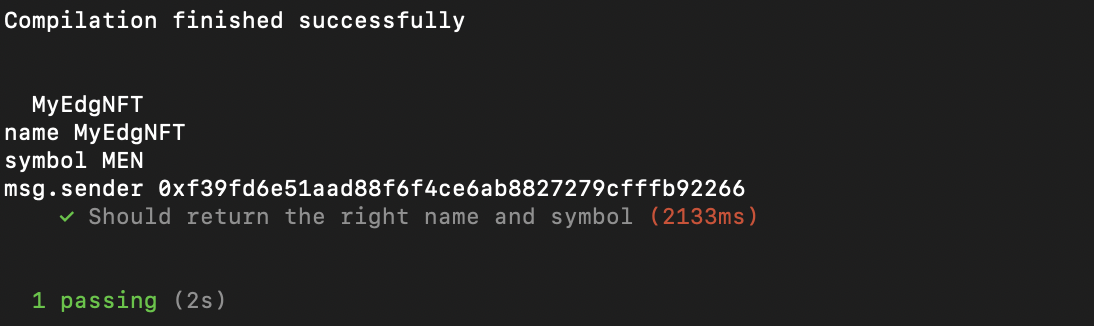
This makes debugging a lot easier for you.
One caveat is that it supports only these data types:
- uint
- string
- bool
- address
But other than that, you can use it as if you are writing JavaScript.
How to Deploy the Contract
All right! Now let’s deploy our contract. We can deploy our contract to one of the testing networks, the Mainnet, or even a mirrored version of the Mainnet in local.
We'll give a walkthrough here on how to deploy to your local machine.
Make a new directory called scripts in the root directory and deploy.js in it.
Terminal
mkdir scripts && cd scripts && touch deploy.js
Here is the deploy script. You deploy along with constructor values:
deploy.js
async function main() {
  const MyEdgNFT = await hre.ethers.getContractFactory("MyEdgNFT");
  const myEdgNFT = await MyEdgNFT.deploy("MyEdgNFT", "ENFT");
  await myEdgNFT.deployed();
  console.log("MyEdgNFT deployed to:", myEdgNFT.address);
}
main()
  .then(() => process.exit(0))
  .catch((error) => {
    console.error(error);
    process.exit(1);
  });
info
You might want to remove console.log() before you deploy. And then run this deploy script with:
terminal
npx hardhat run scripts/deploy.js
Boom! Now your NFT contract is deployed to the local network.

You can target any network configured in the hardhat.config.js depending on your needs. You can find more about configuration here.
Hardhat Configuration File
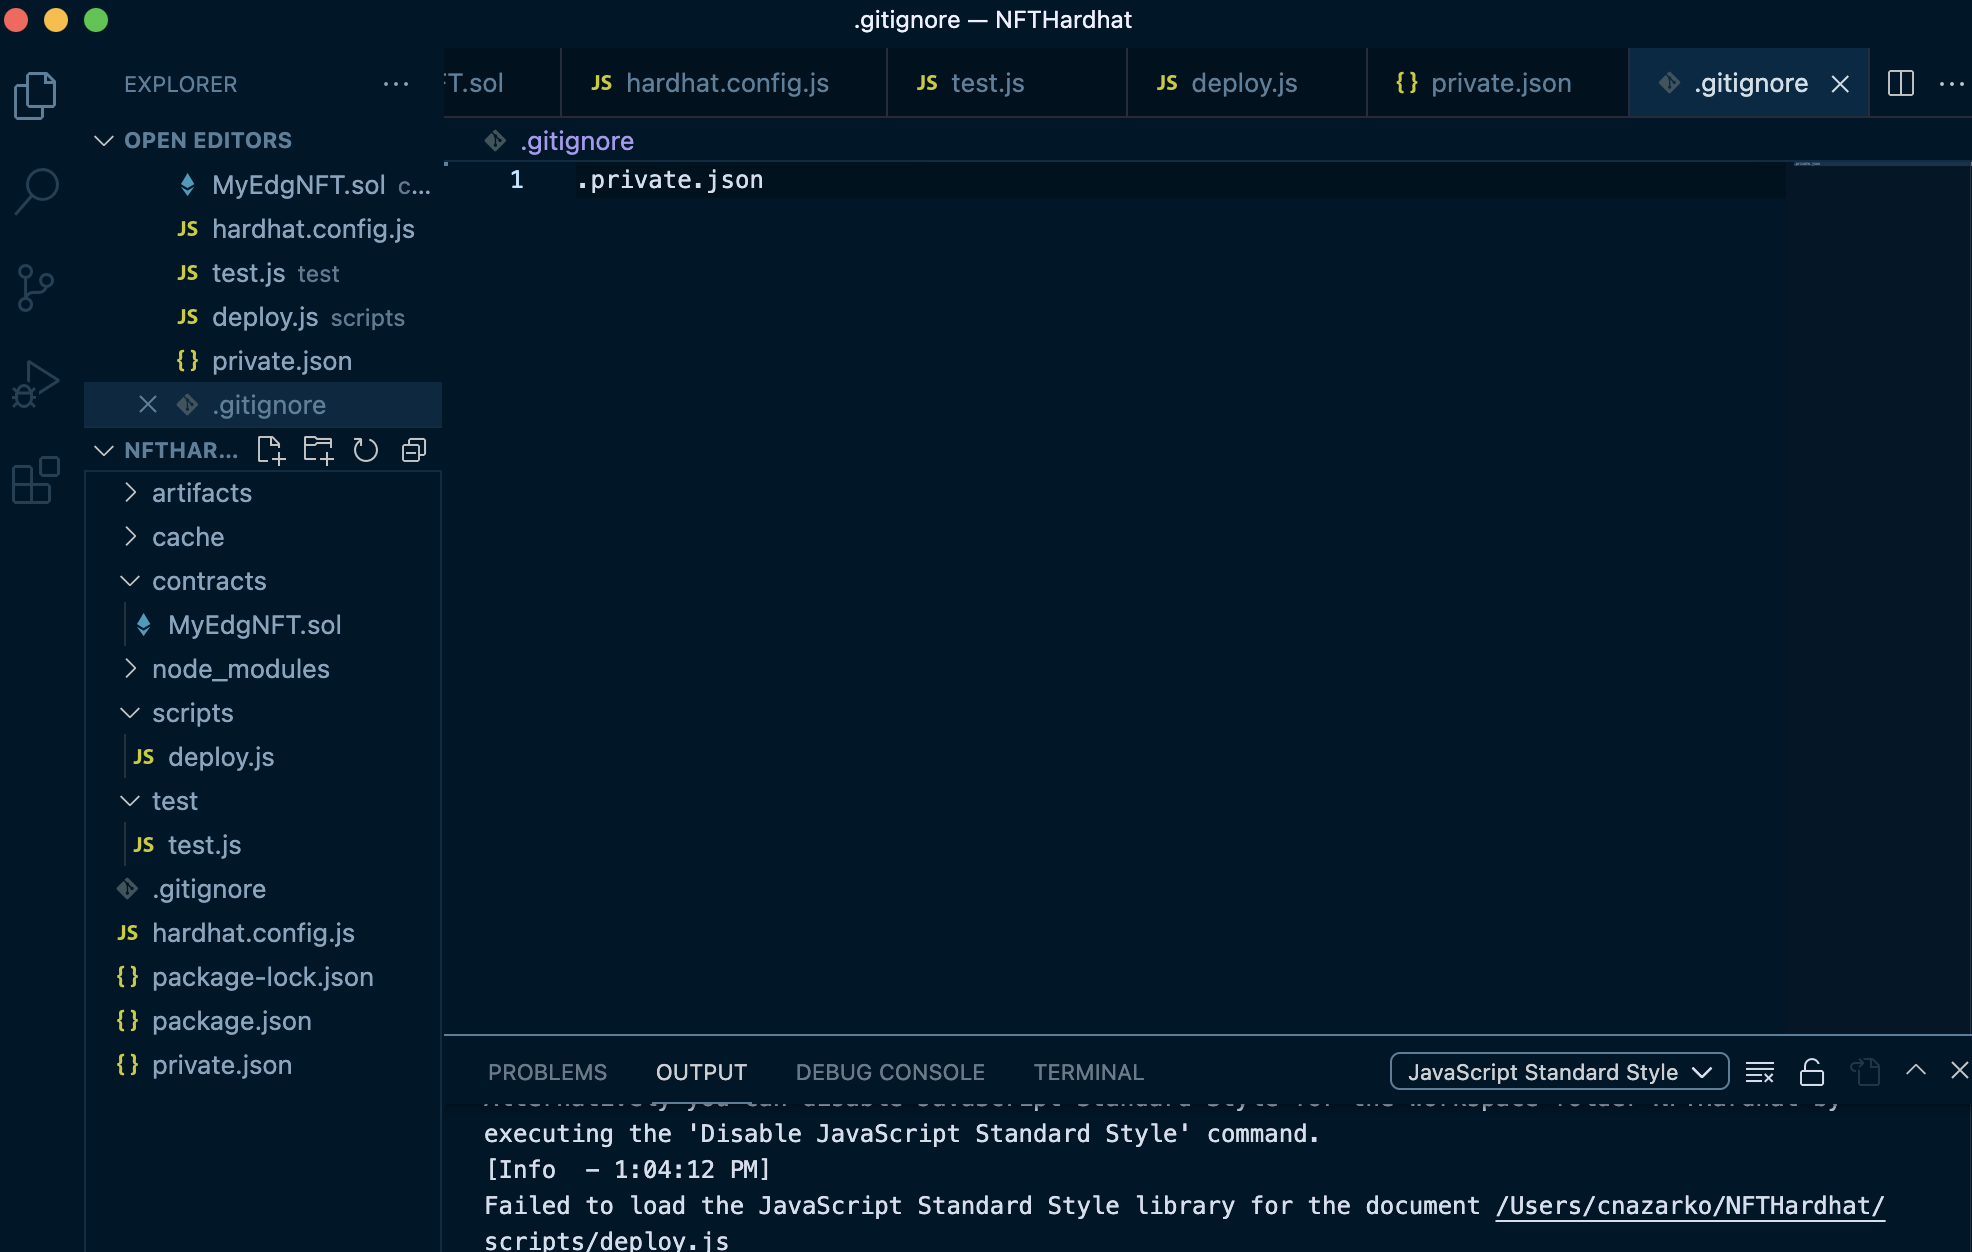
We need to modify our Hardhat configuration file so we can compile and deploy contracts into the Edgeware ecosystem. If you have not yet done so, connect your MetaMask Account to our ecosystem and fund it with the automated faucet bot on discord. We will use the private key of the account created to deploy the contract. If you don’t know the private key, you can export it from MetaMask.
Next, we import the private key that we've retrieved from MetaMask and store it in a .json file. This file should be created under the root directory, and named private.json. Because this key is highly sensitive information, it's very important that we are not revealing any information when deploying. To ensure this, we want to create a .gitignore file under our root directory. Then, you can ignore any files by using the format: .filename or any directories by using: directory/. In our case, we are trying to ignore our private key file so it should look like this:Add a caption
The private.json file must contain a privateKey entry, for example:
private.json
{
  "privateKey": "YOUR-PRIVATE-KEY-HERE"
}
Inside the module.exports, we need to provide the Solidity version (0.8.1 according to our contract file), and the network details. Here, we are using test-net (Beresheet) network for the following example :
- Network name: Beresheet
- RPC URL: https://beresheet-evm.jelliedowl.net
- Chain ID: 2022
If you want to deploy to a local Edgeware development node, you can use the following network details:
- Network name: dev
- RPC URL: http://localhost:9933/
- Chain ID: 2021
If you want to deploy on the Edgeware mainnet, you can use the following network details:
- Network name: Edgeware
- RPC URL: https://edgeware-evm.jelliedowl.net/
- Chain ID: 2021
The Hardhat configuration file should look like this:
hardhat.config.js
// ethers plugin required to interact with the contract
require("@nomiclabs/hardhat-ethers");

// private key from the pre-funded Beresheet testing account
const { privateKey } = require("./private.json");

module.exports = {
  // latest Solidity version
  solidity: "0.8.1",

  networks: {
    // Beresheet network specification
    Beresheet: {
      url: `https://beresheet-evm.jelliedowl.net`,
      chainId: 2022,
      accounts: [privateKey],
    },
  },
};
Great! We are now ready for deployment.
Hardhat has some other cool features like helpful stack trace, support for multiple Solidity compiler versions, robust Mainnet forking, great TypeScript support, and contract verification in Ether scan.